
Choosing the Best Water Chiller for Your Laser Cutter
Choosing the best water chiller for your laser cutter is essential for anyone looking to use their laser system frequently or for extended periods.
The decision between an external water chiller unit and a submersible pump can significantly affect your laser's performance and longevity.
The good news? Here at Focused Laser Systems, we've teamed up with our in-house engineers to break down the cooling game for you completely!
We'll explain the key functions of your laser's cooling system, with a deep dive into the CW-3000 and CW-5200 water chillers. By the end, you'll have all the info you need to make the most informed decision for your laser setup.
Why Does a Laser Cutter Need a Chiller Unit?
Think of an external chiller as a dedicated cooling system for your laser tube. As the laser source operates, it generates heat. That's where the chiller comes in: its main job is to maintain a constant water temperature, protecting your laser from its worst enemy: overheating.
When your CO₂ laser tube gets too hot, its performance drops, and you risk permanent damage (like a cracked tube!).
What Is an External Water Chiller, and How Do They Work?
These chiller units work through a process called heat exchange, which is more straightforward than it sounds. Here’s the breakdown:
1. Extract the Heat: As your laser operates, the water jacket around the tube gets hot. The chiller actively pulls that hot water out.
2. Chill the Water: The hot water is pumped into the chiller unit and through a radiator.
3. Vent the Heat: Just like your car's radiator, fans blow air across the system, drawing the heat away from the water and venting it into the room.
4. Return the Cool Water: The newly cooled water is then sent right back to the laser tube to pick up more heat, keeping the loop going.
This constant, active cycle keeps your laser tube running efficiently and safely, even during marathon cutting sessions.
A Closer Look at Choosing the Best Chiller Unit for Your Laser Cutting Machine
Alright, let's get into the specifics. You'll most often see two models when you start shopping: the CW-3000 and the CW-5200. They look similar, but they work in fundamentally different ways.
The CW-3000 Water Chiller: The Reliable (Passive) Cooler
The CW-3000 is a compact, budget-friendly unit and the go-to choice for low-power CO₂ laser tubes (generally 80W or less) that you'll often find in desktop engravers or hobbyist laser cutters.
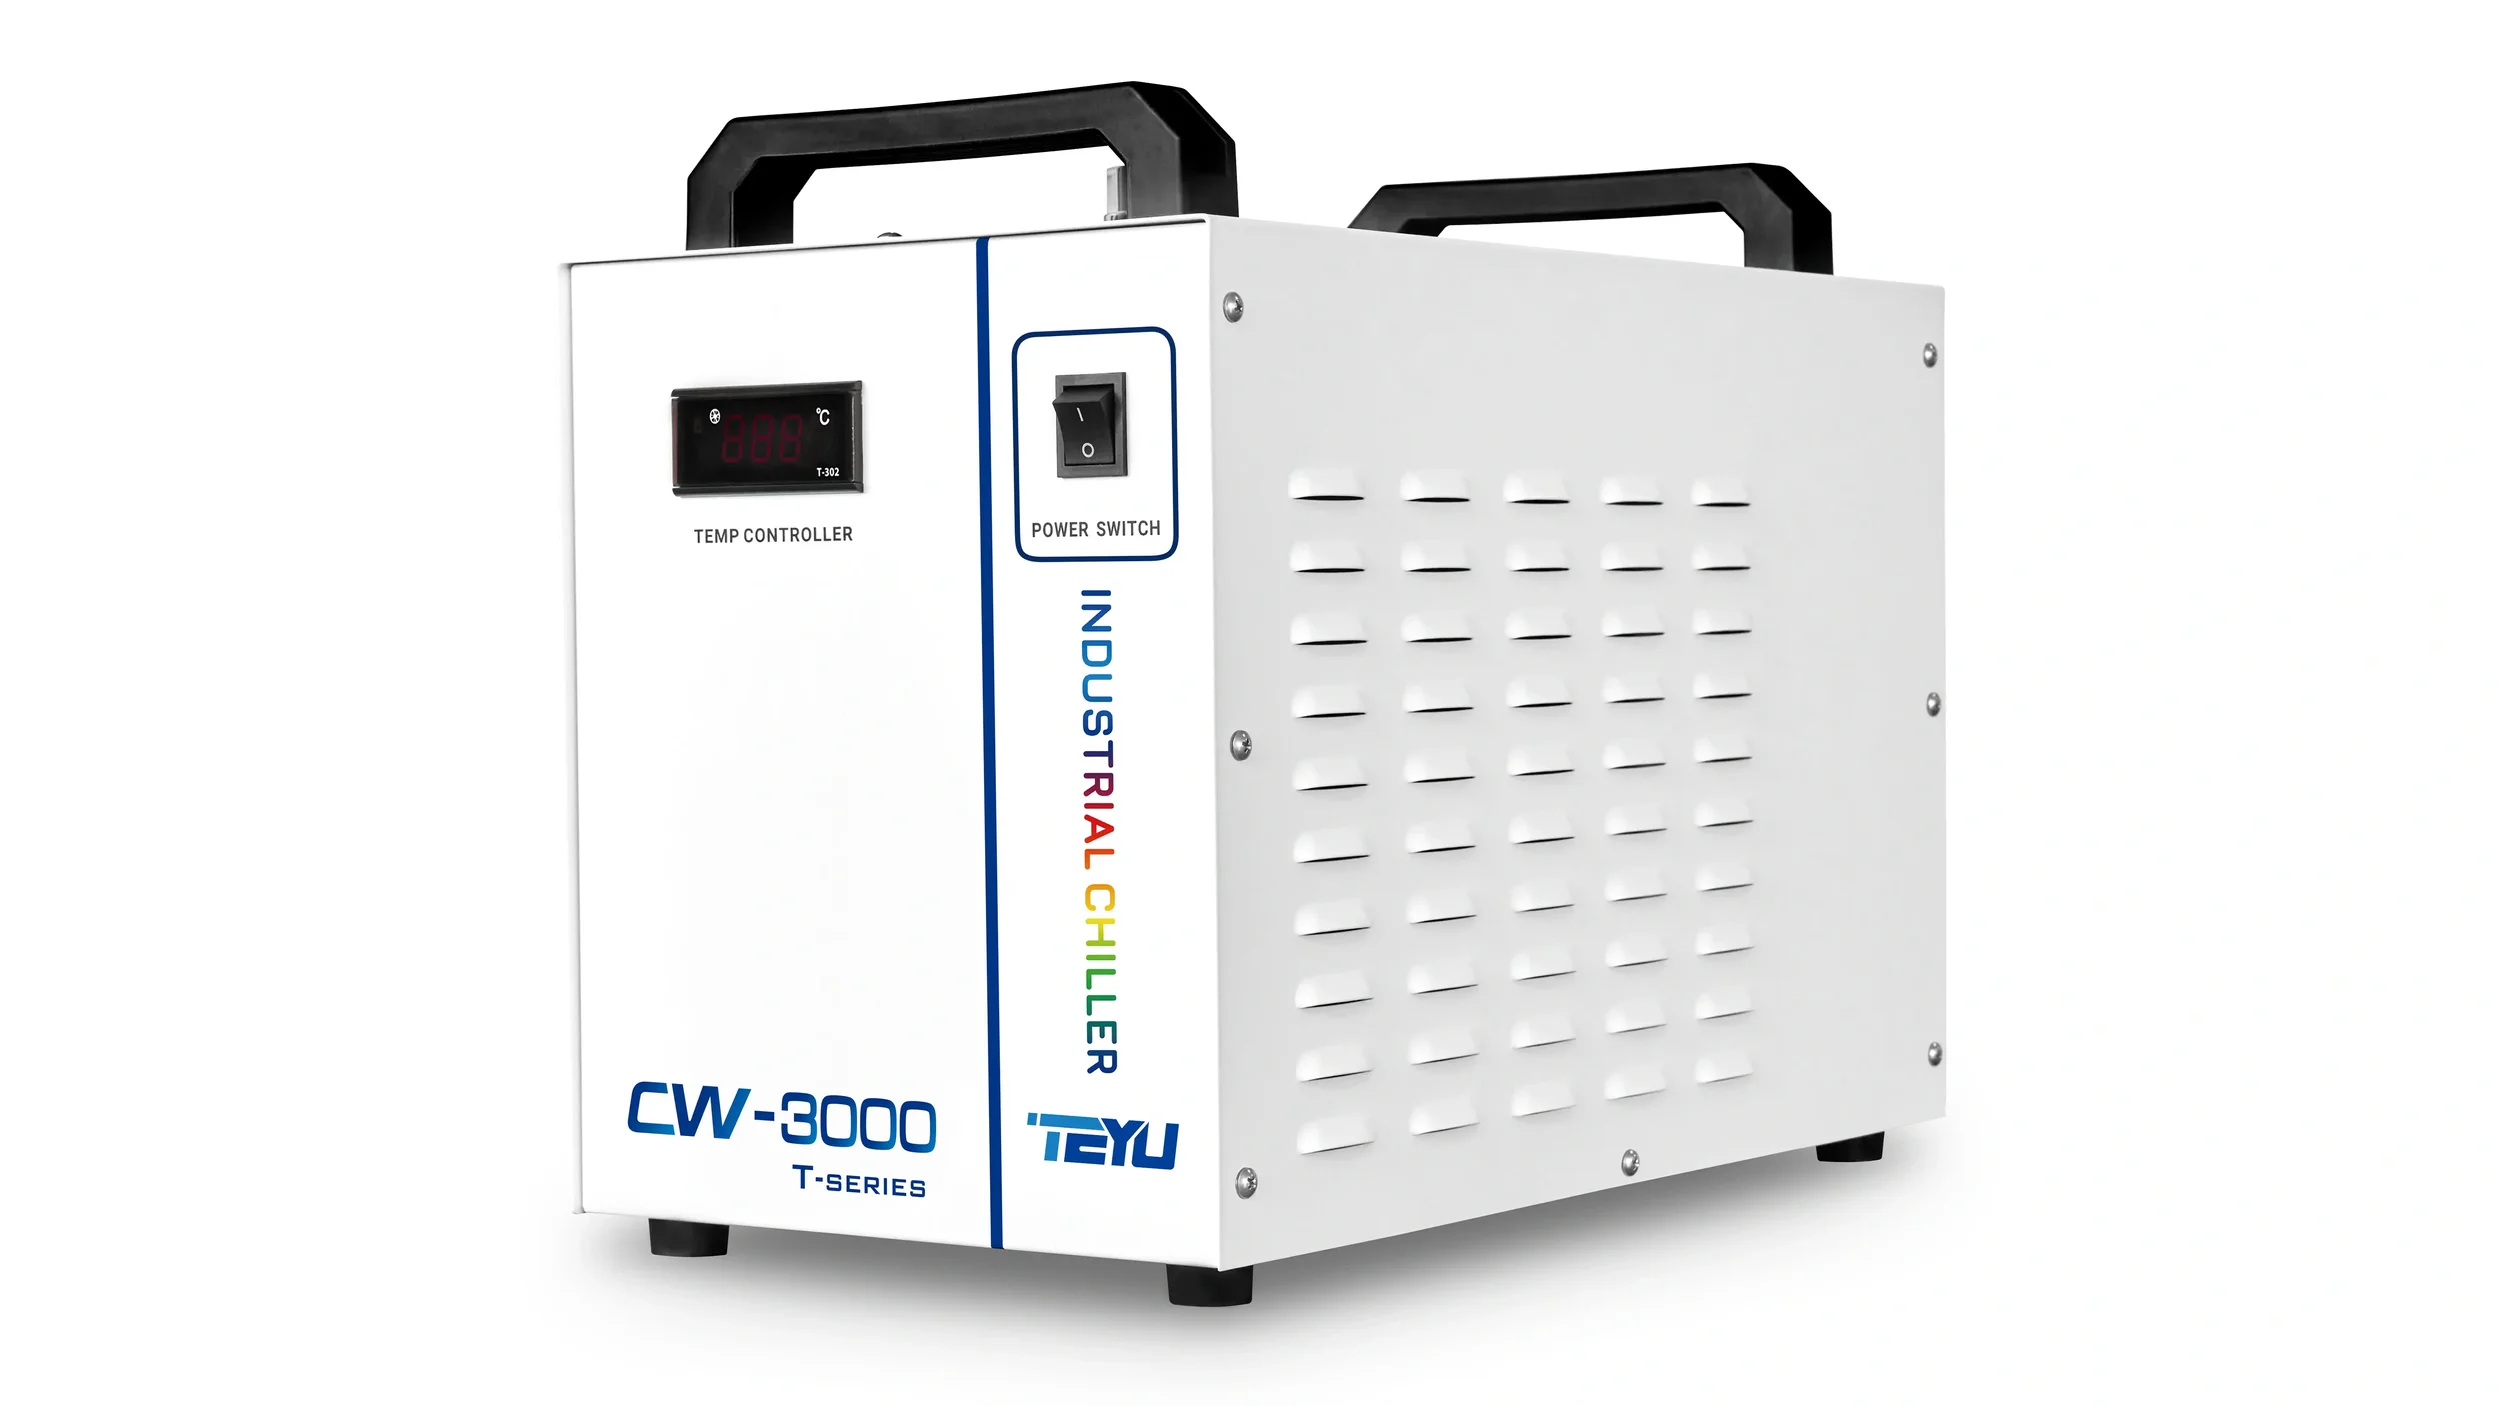
The most important thing to know about the CW-3000 is that it's a passive cooler (also called a "thermolysis" type), meaning it doesn't have a compressor or refrigerant. Think of it like a car's radiator: it uses fans and a large water reservoir to dissipate heat.
Key takeaway: The CW-3000 will help keep your water from overheating by cooling it toward the room's temperature, but it cannot actively cool it below the ambient room temperature.
CW-3000 Chiller Review: Key Features, Specs & Limitations
Performance (Passive Cooling)
Heat Dissipation: It's ideal for removing moderate amounts of heat. It's rated to dissipate 50W of heat for every 1°C the water is above room temp. It's perfect for hobbyists or machines up to 80W.
Large Water Tank: Holds 9 litres (about 2.4 gallons) of water. This large volume acts as a heat buffer, giving you longer, stable run times before the water gets too warm.
Forced Circulation: A powerful internal pump keeps the water flowing consistently, which is crucial for pulling heat away from your tube.
Safety and Monitoring
Built-in Alarms: This is its best feature! It has audible and visible alarms for water flow issues and high temperatures. You can even connect it to your laser's controller, so it automatically stops the job if the water stops flowing, preventing damage to your laser tube.
Real-Time Temp Display: A simple digital screen shows you the current water temperature at a glance.
Design and Usability
Compact & Portable: It's small, light, and has built-in handles, making it easy to set up and move.
Energy Efficient: With no power-hungry compressor to run, it's very cheap to operate.
User-Friendly: The setup is straightforward: add water, plug it in, and connect the tubes.
The CW-5200 Chiller Unit: The Industrial (Active) Chiller
Now we're talking serious cooling. The CW-5200 is a true industrial-grade active chiller.
This powerhouse watch chiller unit you need for industrial laser cutters (up to 150W) or for any setup where passive cooling in a hot environment won't cut it.

Unlike the CW-3000, the CW-5200 works like a mini-refrigerator. It has a compressor and an eco-friendly refrigerant (such as R-410a) to chill the water actively.
Key takeaway: The CW-5200 can chill your water to a precise temperature and keep it there, even in a hot workshop environment. It's the ultimate in laser tube protection and performance.
CW-5200 Chiller Review: Key Features, Specs & Limitations
Performance and Control
Active Cooling Capacity: This unit boasts a 1.4kW (1400W) cooling capacity, making it perfect for more demanding, medium-powered lasers.
Precise Temperature Control: This is its superpower. It can maintain water temperatures with incredible stability (±0.3°C). This stability is what gives your laser tube the longest possible life.
Dual Operating Modes:
Intelligent Mode: The "set it and forget it" option. It automatically adjusts the water temperature to match the room's temperature, cleverly preventing condensation (water droplets) from forming on your laser tube.
Constant Mode: You set a specific temperature (e.g., 20°C / 68°F), and the chiller will maintain it regardless of conditions.
Safety and Protection
Advanced Alarms: Includes all essential alarms for water flow and over-temperature, plus overcurrent protection for the compressor.
Error Code Display: If an alarm goes off, the digital screen displays a specific error code to help you quickly diagnose the problem.
Construction and Ease-of-Use
Compact Footprint: For all the power it packs, it's still small enough to fit neatly in most workshops.
Easy-to-Read Tank: The 6-7L tank has a clear water level gauge, so you always know when it's time for a top-up.
Durable & Green: It's built with high-quality connections to prevent leaks and uses modern, eco-friendly refrigerants.
Digital Display: The screen gives you real-time temperature monitoring and easy access to settings.
What Is Preventive Maintenance for External Chiller Units?
When it comes to CO₂ laser maintenance, people often overlook their chiller units —please don't be one of them. A little tlc goes a long way in protecting your investment. Here are the two most crucial preventive maintenance tasks for your chiller.
1. Use the Right Water (This is the big one!)
One of the most critical rules of owning a water chiller: Always, always fill your chiller with distilled or deionised water.
It's tempting to use tap water, but please don't! Tap water contains minerals and impurities that accumulate over time. This "scaling" will clog your laser tube, corrode the chiller's components, and kill your cooling efficiency. Sticking with pure, distilled water is the #1 way to ensure optimal heat transfer and protect your entire system from costly, premature damage.
2. Do a Quick, Regular Check-up
Get in the habit of giving your setup a quick "walk-around" before you start a big job:
Check for Leaks: Glance at the hoses and connections to make sure everything is snug and dry.
Check the Water Level: Keep an eye on the water level gauge, especially during lengthy cutting sessions. If it's low, top it off with (you guessed it) more distilled water!
How Often Should an External Chiller Be Serviced?
We recommend scheduling preventative maintenance for your chiller at least once a year, ideally alongside your annual laser cutting machine service. This yearly service is key to identifying and addressing potential issues before they cause performance problems or costly downtime.
How to Install Your CO2 Laser Chiller: An Easy Step-by-Step Guide
Setting up your new chiller is pretty straightforward. Here’s a quick-start guide to get you up and running:
Find the Right Spot
Choose a location for your chiller that has plenty of room to "breathe." Good ventilation is key for the fans to work. You'll also want it near your laser for easy access for refilling and maintenance.
Connect the Hoses
Hook up the water inlet and outlet hoses between the chiller and your laser machine. Most chillers come with clear instructions. The most crucial part is ensuring all fittings are snug and secure—this prevents nasty leaks!
Fill With the Right Water
Fill the chiller's tank through the designated opening. Remember our pro-tip: only use distilled or deionised water! Keep an eye on the water level gauge to make sure you've added enough.
Power It On
Plug the chiller into a suitable power outlet and flip the switch. If it has a digital display, watch it for a moment to verify that the unit is on and the temperature is reading correctly.
Connect the Safety Alarm (This is a CRITICAL step!)
Connect the chiller's "alarm" port to your laser controller. This cable is what allows the chiller to automatically stop your laser job if the water stops flowing or gets too hot, saving your tube from catastrophic damage.
This specific cable usually comes with your laser machine, not the chiller (since it's machine-specific). If you can't find it or aren't sure how to connect it, do not skip this step! Please reach out to our engineers for support.
Run a Quick Test
Before you start a 3-hour engraving job, run your CO2 laser for a few minutes. Keep an eye on the chiller's temperature display and check your connections one last time to ensure everything is functioning perfectly.

A submersible pump is exactly what it sounds like: a small, sealed pump that you drop directly into your water container (usually a 5-gallon bucket). Its only job is to circulate that water from the bucket, through your laser tube to pick up heat, and then back into the bucket.
For many hobbyists and new laser owners, this is the go-to starting point.
The Advantages of Using a Submersible Pump for your CO₂ Laser
It's Inexpensive: This is the biggest draw. A pump and a bucket are significantly cheaper than a dedicated chiller, making it a popular choice for budget-conscious setups.
It's Easy to Install: The setup is straightforward. You connect the tubes, drop the pump in the water, and plug it in. It's very accessible for beginners.
It Saves Space: Your "cooler" is just a bucket, which you can easily tuck under your machine, saving valuable workshop space.
It's Fairly Reliable: These pumps are built to live in water, so they are generally durable for continuous operation.
The Risks & Downsides of Cooling Your Laser Tube with a Submersible Pump
This is where that low price tag comes with some serious drawbacks you need to be aware of:
It Has Zero Active Cooling: This is the most critical point. A pump only circulates water; it does not cool it. The only "cooling" you get is the heat slowly escaping from the water's surface. On a long job, the water gets hotter... and hotter.
No Temperature Control: Because it can't cool, your water temperature is at the mercy of your room's temperature. On a hot day, your water might start too warm, putting your tube at risk before you even press "start." This heat is the #1 killer of laser tubes.
It's a High-Risk "Dumb" System: If your pump fails, the water flow stops. If you don't notice immediately, you will crack your laser tube. Unlike a chiller, a simple pump has no safety alarms to warn you or automatically shut down your laser.
Not for Powerful Lasers: This method is only suitable for low-power tubes (think 60W or less) doing short jobs. Any machine over 60W, or any operator doing long engravings, will quickly overheat the water.
Messy Maintenance: The open bucket is a magnet for dust, debris, and even algae. This gunk can get sucked into your laser tube and clog it. You'll need to clean the bucket and change the (distilled) water very frequently.
You'll Outgrow It: As soon as you want to run longer jobs, work in the summer, or upgrade your laser, this pump system will become your biggest bottleneck. You'll almost certainly need to invest in a chiller later.
Chiller Units vs. Submersible Pumps
So, what’s the bottom line?
A submersible pump is a budget-friendly way to get started, especially for very light hobby use. But that's where its advantages end.
A dedicated external chiller is a true investment in your laser's performance and longevity. You get:
Total temperature control, even on hot days or during long jobs.
Critical safety alarms that actively protect your expensive laser tube from damage.
A longer-lasting tube, far less downtime, and better energy efficiency.
Our professional recommendation? While a pump can work, we always recommend a dedicated chiller unit for your setup if it fits your budget. It's the single best insurance policy you can buy for your laser cutter.
Still Not Sure Which Is Right for You?
Don't guess when it comes to protecting your laser.
The right choice depends on your specific machine, the materials you use, and how long your jobs run—and we're here to help you figure it all out.
Contact our engineers at Focused Laser Systems today for personalised, no-pressure advice on the perfect chiller for your setup.